Accession Reference Manual

Accession Reference Manual
The program may be run either interactively (-gui) or under an OS
shell command line interface to implement batch (-nogui). If the
default -gui mode is used, after the spot pairing is finished, the
user has the option of interactively examining the paired spot data
overlayed on the original sample images. The user may also modify the
input switch options and save the new options in a
"Accession.properties" file in the current project directory when they
exit so that the last used options may be used as the default switch
options in subsequent running of Accession.
The application looks up the sample in the accession database (in
xml/accession.xml or as specified using the -accessionFile switch) and
gets additional information about the sample. The Open2Dprot
http://open2dprot.sourceforge.net/Accession pipeline module is
used for entering samples into the accession database.
[Status: The Open2Dprot Accession module program is not released yet.
The accession database could be edited manually as either XML
(accession.xml), or tab-delimited text (accession.txt) with Excel.]
There may be images associated with the samples that can be used with
the ROI image viewer. This is the case if the spots are to derived
from real images (e.g., 2D gels) or virtual images (e.g., from
synthesized 2D LC-MS data), etc. These images may be in TIFF (.tif,
.tiff), JPEG (.jpg), GIF (.gif), or PPX (.ppx GELLAB-II) format. TIFF
images may be 8-bits/pixel through 16-bits/pixel, whereas JPEG, GIF,
and PPX are 8-bit images. Gray values in the image files have black as
0. This is mapped after reading to 0 for white and the maximum pixel
value for black.
The input sample image files, if any, are kept in the
user-project-directory/ppx/ sub-directory. This database
directory structure is consistent with and is used by the other
Open2Dprot analysis pipeline programs.
The computing window is defined as [x1:x2, y1:y2]. You can set the
computing window using the -cw:x1,x2,y1,y2 command line
switch. If you have not defined it or it is not defined in the
accession database (if the -accessionFile option is used), it is
defined as [0:pixWidth-1 x 0:pixHeight-1] where the virtual image is
of size pixWidth x pixHeight.
[STATUS: The computing window for each sample entry is defined in the
accession database. The Accession program will allow users to define
the computing window.]
If you specify an image to be semented, it will check whether it is in
a ppx/ subdirectory. If not, it will ask you if you want to create a
project directory and will then set up the following four directories
and copy your image into the ppx/ directory. You can also use the
-projDir:user-project-directory switch to specify a (possibly
new) project directory.
If you are using the Windows Accession.exe file or clicking on the
Accession.jar file, you can't change the default startup memory.
However, if you are using the Accession.jar in a script using the java
interpreter as in the following example which uses the -Xmx256M
(specifying using 256Mbytes at startup). Change 256 to a larger size
if you want to increase startup memory.
All logged output is sent to the report window in a scrollable text
window that may be saved or used for cut and paste operations. A set
of command buttons at the bottom of the window are replicates of
commands in the menus, but are easier to access. They include the
following functions:
The documentation is kept on the Internet at
http://open2dprot.sourceforge.net/Accession. Normally, these help
commands should pop up a Web browser that directly points to the
Accession Web page. If your browser is not configured correctly, it
may not be able to be launched directly from the Accession
program. Instead, just go to the Web site with your Web browser and
look up the information there.
An Internet connection is required to download the program from the
Open2Dprot Accession Web site. New versions of the program and
associated demo data will become available on this Web site and can be
uploaded to your computer using the various
(File | Update | ...) menu commands. If you have obtained the
installer software that someone else downloaded and gave to you, then
you do not need the Internet connection to install the program. We
currently distribute Accession so that it uses up to 256Mb.
See discussion on increasing memory
by editing the demo- startup scripts.
You can these images in the list below or view all of the screen shots in a
single Web page.
The data for these scripts is in the demo/ directory available with the
installation which also includes the scripts.
Alternatively, you can download the demo data from the Files Mirror as
Demo.Z.
The installation packages are available from the
Files mirror
under the Accession releases.

Figure 1. Screen view of the Accession program Report Window
interface
This screen shot shows the Accession Report Window graphical user
interface after starting. There are four pull-down menus at the top of
the window: File, Edit, View and Help. There is a row of command
buttons and other controls on the bottom of the window. There is a
text-report region in the middle of the window that will contain
messages, reports and other output from the program. The command
buttons Clear and SaveAs respectively clear and save the
contents of the report region into a text file. The Edit
options button changes the default command line options for the
Accession program. The Accession button will popup an accession
information editing window for the currently selected sample (File
| Open Sample for editing). [See File menu for more information of
selecting samples]. The ROI button will popup a Region Of
Interest (ROI) editing window for the currently selected sample. The
Calibrate pull-down choice will will popup a grayscale
calibration editing window for the currently selected sample. There
are four calibration choices: Calibrate wedge, Calibrate spot list,
Calibrate by file, Calibrate manual data.
1. Introduction
Accession is an open source Java 2D sample accessioning program for
entering new samples into the Open2Dprot database. It allows you to
associate (currently limited) experiment information with the sample,
define regions of interest (for spot segmentation, wedge calibration,
etc.), and to calibration image grayscale (if images are used) with
particular calibration values (e.g. Optical Density) if a calibration
is available.
It is part of the Open2Dprot project (
http://open2dprot.sourceforge.net/).
Accession is similar to the derived the the GELLAB-II 2D gel spot
pairing program getacc described in the GELLAB-II reference
manual. Accession has been generalized to other types of samples
besides 2D gels. While the original program was written in C,
Accession is written in Java, uses XML input and output files and has
an optional graphical user interface. This initial open-source
Accession program code could be used as the basis for more advance
spot pairing methods. Currently the accession file is
accession.xml and is stored in the project
"project"/xml/ directory.Project directory structure for Open2Dprot and Accession
All Open2Dprot programs assume a project directory structure. This
must exist for the program to proceed. You can either create the
structure prior to running any of the programs or you can create it on
the fly using the -projDir:user-project-directory. It will
lookup and/or create the following sub-directories inside of
theuser-project-directory.
    batch/ directory holding temporary batch files - [NOT USED by Accession]
    cache/ directory holding temporary CSD cache files - [NOT USED by Accession]
    ppx/ directory holding your original gel input files
    rdbms/ directory holding CSD database RDBMS files - [NOT USED by Accession]
    tmp/ directory holding generated sample image files
    xml/ directory that holds  accession DB, landmark DB,
             SSF spot-list files, and generated SPF paired spot list file
             generated by Accession
The use of these directories is discussed in the rest of this
document.Accession database file
The sample and reference samples to be paired is specified by its
image file name using the -sample and -rsample switches with or
without the file extension (e.g., -sample:plasma27.tif or
-sample:plasma27). The file extension is determined by looking up the
image in the ppx/ project subdirectory at run time.2. Editing Methods
There are three editing methods: accession
information,/A> editing, Region Of Interest
editing in the image (if relevant for the types of samples you are
using), and grayscale calibration editing.
2.1 Accession information editing popup window
All samples in the accession database must have their associated
information defined. Currently, this is defined using the Accession
information editing popup window. After editing this data, the
accession database should be saved. It is also saved on exiting from
the Accession program. [Note: when the new MIAPE standard is
integrated with Open2Dprot, the Accession program will be replaced or
modified to take this into account].

Figure 2.1 Screen view of the Accession information popup editing
Window interface.
This screen shot shows the Accession Information editor popup Window
graphical user interface after starting. You must set the current
sample prior to starting this editor. There are three
pull-down menus at the top of the window: File, Edit, and Help. There
is a row of command buttons and other controls on the bottom of the
window. There is a scrollable list of Accession DB field names on the
left (non-editable) and their corresponding values (editable) on the
right. The ![]() Use log checkbox
also copies local text output to the main Accession Report window.
The Reset Defaults button resets the values to what they were
when you first started editing with this popup window. The
Done button saves any changes and exits this popup information
editor. The Cancel button does NOT save any changes and exits
this popup information editor.
Use log checkbox
also copies local text output to the main Accession Report window.
The Reset Defaults button resets the values to what they were
when you first started editing with this popup window. The
Done button saves any changes and exits this popup information
editor. The Cancel button does NOT save any changes and exits
this popup information editor.
2.1.1 Pull-down menus in the accession information editing popup
window
The menu bar a the top of the Accession Information editing Window
contains three menus. The menu notation
is specified in Section 5.
2.1.1.1 Accession Info File menu
![]() -
use the values from the specified template sample for this sample
being edited. It does NOT copy the
-
use the values from the specified template sample for this sample
being edited. It does NOT copy the
------------------------------------
![]() Log text output to Report window - copy all text out to this
popup window to the main Accession Report Window as well.
Log text output to Report window - copy all text out to this
popup window to the main Accession Report Window as well.
------------------------------------
------------------------------------
2.1.1.2 Accession Info Edit menu
These commands are used to change various defaults for the accession
information being edited for the current sample.
2.1.1.3 Accession Info Help menu
These commands are used to request information about Accession
information editing.
2.2 Region of Interest (ROI) editing
This popup window allows region of interest editing. These are used
for calibration in the Accession program and also for defining these
regions for their definition for the accession database. If no
regions of interest are needed, this step may be skipped.

Figure 2.2 Screen view of the Region Of Interest (ROI) popup
editing Window interface.
This screen shot shows an example of the popup ROI editing Window
graphical user interface after starting. ROIs may be used in some
circumstances and may not be required in others. There are two ROIs:
the image computing window ROI used to specify where the image
segmenter is to look for spots to detect; and gray scale wedge
calibration ROI used to specify a grayscale calibration wedge (if
available in the image).
You must set the current sample prior to starting this editor.
There are five pull-down menus at the top of the window: File, View,
Roi, Spot list, and Help. There is a row of command buttons and other
controls on the bottom of the window. There is a local ROI reporting
window at the top. There is a scrollable image in the center of the
ROI editor. The are several overlay option checkboxes: ![]() Draw ROI,
Draw ROI, ![]() Draw CW ROI, and
Draw CW ROI, and ![]() Draw CAL ROI.
These may also be set from the View menu. The
Draw CAL ROI.
These may also be set from the View menu. The
![]() Use log
checkbox is used to also copy local output to the main Accession
Report window. The Save image button saves the image window
with the overlays you have specified into a local GIF image file. The
Done button saves any changes and exits this popup ROI editor.
The Cancel button does NOT save any changes and exits this
popup ROI editor.
Use log
checkbox is used to also copy local output to the main Accession
Report window. The Save image button saves the image window
with the overlays you have specified into a local GIF image file. The
Done button saves any changes and exits this popup ROI editor.
The Cancel button does NOT save any changes and exits this
popup ROI editor.
2.2.1 Pull-down menus in the Region Of Interest (ROI) editing
popup window
The menu bar a the top of the ROI editing Window contains three
menus. The menu notation is specified in
Section 5.
2.2.1.1 ROI editing File menu
------------------------------------
------------------------------------
2.2.1.2 ROI editing View menu
These commands are used to change various defaults for the accession
ROI being edited for the current sample.
![]() Draw trial ROI overlay
- draw the trial ROI overlay (cyan color).
Draw trial ROI overlay
- draw the trial ROI overlay (cyan color).
![]() Draw CW ROI overlay
- draw the computing window (CW) ROI overlay (red color). The CW
ROI is used to define the image region to segment or find spots.
Draw CW ROI overlay
- draw the computing window (CW) ROI overlay (red color). The CW
ROI is used to define the image region to segment or find spots.
![]() Draw calibration wedge ROI
overlay - draw the calibration wedge ROI overlay (blue
color). This can be used over a grayscale calibration wedge region
in the image.
Draw calibration wedge ROI
overlay - draw the calibration wedge ROI overlay (blue
color). This can be used over a grayscale calibration wedge region
in the image.
![]() Draw measured spot
overlays - draw measured spot overlays (magenta color). This
is used if calibration if being performed using a list of spot
measurements.
Draw measured spot
overlays - draw measured spot overlays (magenta color). This
is used if calibration if being performed using a list of spot
measurements.
![]() Draw measured spot
labels - draw measured spot overlay labels (magenta color). This
is used if calibration if being performed using a list of spot
measurements. The spot labels are "#1", #2", ... "#n".
Draw measured spot
labels - draw measured spot overlay labels (magenta color). This
is used if calibration if being performed using a list of spot
measurements. The spot labels are "#1", #2", ... "#n".
------------------------------------
![]() -
if not "none", i.e. "3x3", "5x5", ... "21x21", show the region
around the current pixel.
-
if not "none", i.e. "3x3", "5x5", ... "21x21", show the region
around the current pixel.
2.2.1.3 ROI editing Roi menu
These commands are used to request information about Accession
ROI editing.
2.2.1.4 ROI editing Spot List menu
These commands are used to request information about Accession
spot list measurement editing.
------------------------------------
------------------------------------
![]() - to one of
"1x1", "3x3", "5x5", ... "29x29" values. The spot density measurement
is the sum of gray values under this square.
- to one of
"1x1", "3x3", "5x5", ... "29x29" values. The spot density measurement
is the sum of gray values under this square.
![]() Recompute spot-list
measurements with common size - recompute spot-list with the same
common size. This lets you change the spot measurement size for all
spots and the corresponding total densities after the spot list was
defined.
Recompute spot-list
measurements with common size - recompute spot-list with the same
common size. This lets you change the spot measurement size for all
spots and the corresponding total densities after the spot list was
defined.
![]() Recompute spot-list
measurements with background correction - recompute spot-list with
background correction. This lets you add or remove the background
correction after the spot list was defined.
Recompute spot-list
measurements with background correction - recompute spot-list with
background correction. This lets you add or remove the background
correction after the spot list was defined.
![]() Sort spot-list
measurements - sort the spot-list by density. This lets you keep a
sorted spot list - even if they were defined out of order.
Sort spot-list
measurements - sort the spot-list by density. This lets you keep a
sorted spot list - even if they were defined out of order.
2.2.1.5 ROI editing Help menu
These commands are used to request information about Accession
ROI editing.
2.3 Grayscale calibration editing
If the samples have associated images, it is sometimes important to
calibrate the grayscale of the images with a standard
calibration. This is especially important if the stains/dyes or
scanner are non-linear to avoid saturation effects in spot
quantification. If no grayscale calibration is needed, this step may
be skipped.

Figure 2.3 Screen view of the Grayscale Calibration popup editing
Window interface.
This screen shot shows the Grayscale Calibration editor popup Window
graphical user interface after starting. You must set the current
sample prior to starting this editor. There are four pull-down
menus at the top of the window: File, View, Edit, and Help. There is
a row of command buttons and other controls on the bottom of the
window. There is a small text reporting area at the top. There is a
grayscale histogram on the left showing various calibration histograms
with associated peak values (OD step-wedge histogram shown). There is
an editable table on the right where you can have the calibration
program estimate the peaks which are then saved in the table. There
are other options decribed below. right. The Analyze wedge
ROI button computes the grayscale histogram of the wedge in the
sample image and updates the table on the right with the histogram
peaks that were found. You must have defined the Wedge ROI prior to
invoking this calibration popup editor. The Add peak button
adds a peak value to the table on the right if you have selected a
peak with the mouse in the histogram prior to pressing this button. It
will insert a peak if the value you select is between two existing
peaks. It redraws the histogram and calibration curve. The Delete
peak button deletes a peak value to the table on the right if you
have selected a peak with the mouse in the histogram prior to pressing
this button. It will remove a peak if the value you select is between
two existing peaks. It redraws the histogram and calibration curve.
The Refresh map from table button refreshes the histogram. This
is useful if you manually edit the table. The Save calibration
button saves the calibration in the accession database. The ![]() Use log checkbox also copies local
text output to the main Accession Report window. The Done
button saves any changes and exits this popup calibration editor. The
Cancel button does NOT save any changes and exits this popup
calibration editor.
Use log checkbox also copies local
text output to the main Accession Report window. The Done
button saves any changes and exits this popup calibration editor. The
Cancel button does NOT save any changes and exits this popup
calibration editor.
2.3.1 Pull-down menus in the grayscale calibration editing popup
window
The menu bar a the top of the Grayscale Calibration editing Window
contains three menus. The menu notation
is specified in Section 5.2.3.1.1 File menu
![]() Log text output to Report window - copy all text out to this
popup window to the main Accession Report Window as well.
Log text output to Report window - copy all text out to this
popup window to the main Accession Report Window as well.
------------------------------------
2.3.1.2 Calibration View menu
These commands are used to change various overlay options for the
grayscale calibration being edited for the current sample.
2.3.1.3 Calibration Edit menu
These commands are used to change various defaults for the grayscale
calibration being edited for the current sample.
2.3.1.4 Calibration Help menu
These commands are used to request information about grayscale
calibration.
3. Running Accession and specifying parameter options via the command line
The program may be run either interactively (-gui) with a graphical
user interface (GUI) or under an OS shell command to implement batch
(-nogui) depending on how it was started. In the former case, after
the spot pairing is finished, the user has the option of interactively
assigning the accession fields using one or more of the popup windows:
Accession, ROI and Calibrate. The user may also modify the input
switch options and save the new options in a "Accession.properties"
file in the current project directory so that it may be used as the
default switch options in subsequent running of the program.
[Status: the Accession.properties file is not enabled.]
All options including the input reference sample and other sample to
be paired are specified via GNU/Unix style switches on the command
line (-switch{optional ':parameters'} and its negation as
-noswitch). However, if GUI mode is used, you can interactively
specify the switches and their options. It is assigned previously by
software that generated the SSF spot lists.
The computing window region of interest
The computing window is a rectangular region or interest in the SSF
spot list (real or virtual) image where data is considered to be
valid. Spots in this region should be paired. Any spots outside of
this region are ignored.Local Folders and files created and used by Accession
When Accession is first started, it will check for the following folders
and files in the installation directory and create them if they can
not be found.
Accession command-line arguments switch usage
The command line arguements usage is:
Accession [< optional switches >]
The complete list of switches is given
later in this manual and as well as some examples of typical sets of switches. The
user defined default switches may be specified as a resource string
'Accession.properties' file saved in the project directory. For
example:
Accession -rsample:gel-HM-19 -sample:gel-HM-071 -project:demo/ -gui
Options wizard window for setting the command line switches
If you invoke the Edit options button in the Report window (or
from the Edit menu), it will popup an options wizard shown in Figure 5
to let you set or change the switch options and then to save these as
the new default switch options. The default is saved in the
Accession.properties file when you exit program.
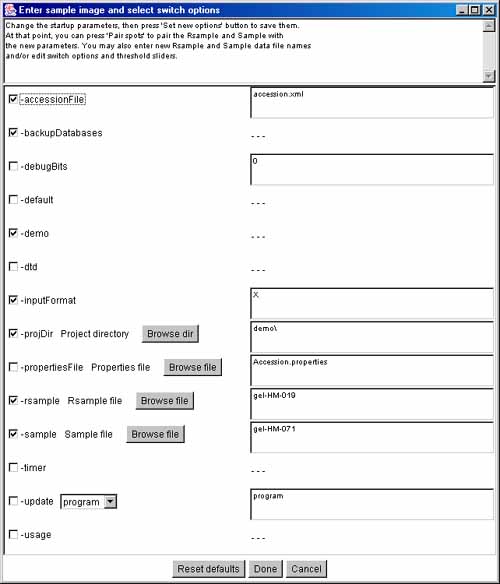
Figure 5. Screen view of the popup options wizard window for
setting the command line switches, parameter and specifying input
samples to be paired.
All of the switches are available in the
scrollable window. Switches are checked if they are enabled and if the
switch requires a value, the current value is shown in the data entry
window to its right. On the right there may be several threshold
sliders for the upper sizing values for several parameters. In the
middle, are several Browse buttons to use for specifying a different
samples (-rsample: and -sample:), and directories.
Clicking on any switch will show a short help message associated with
that switch at the top of the window. Pressing the Done button
will pass the new options values back to Accession. Note: aklthough
you can use the options wizard to change the Rsample and Sample, it is
easier to use the menu comands in the Files menu.
Updating Accession from the Open2Dprot Web server using -update switch
As new versions of Accession are developed and put on the Web server,
a more efficient way of updating your version is to use the -update
commands. There are four options:
        -update:program      to update the program jar file
        -update:demo         to update the demonstration files
        -update:doc          to update the documentation files
        -update:all          to update all of the above
After updating the program, it should be exited and restarted for the
new program to take effect. Increasing the allowable memory used by Accession
If you are working with very large images that require a lot of memory,
you might want to increase the memory available at startup.
java -Xmx256M -jar Accession.jar {additional command line args}
4. Command and Report Window - the command center
Accession is designed to be used efficiently in a batch mode with
minimal command line output. It is also designed to optionally provide
a graphical user interface (GUI) which creates a Report Window that captures a report
of the spot pairing output as well as additional output directed to it
by the user. There are a set of pull-down
menus as well as a set of buttons for often used functions.
5. Main pull-down menus in the Accession Graphical User Interface
(GUI)
The menu bar a the top of the Report Window contains four menus.
Menu notation
In the following menus, selections that are sub-menus are
indicated by a '![]() '. Selections prefaced with a '
'. Selections prefaced with a '![]() ' and indicate '
' and indicate '![]() ' indicate that the command is a checkbox
that is enabled and disabled respectively. Selections prefaced with a
'
' indicate that the command is a checkbox
that is enabled and disabled respectively. Selections prefaced with a
'![]() ' and indicate '
' and indicate '![]() ' indicate that the command is a
multiple choice "radio button" that is enabled and disabled
respectively, and that only one member of the group is allowed to be
on at a time. The default values set for an initial database are shown
in the menus. Selections that are not currently available will be
grayed out in the menus of the running program. The command short-cut
notation C-key means to hold the Control key and then
press the specified key.
' indicate that the command is a
multiple choice "radio button" that is enabled and disabled
respectively, and that only one member of the group is allowed to be
on at a time. The default values set for an initial database are shown
in the menus. Selections that are not currently available will be
grayed out in the menus of the running program. The command short-cut
notation C-key means to hold the Control key and then
press the specified key.
5.1 File menu
These commands are used to open the samples to be paired and other
file operations. The current menus and the menu commands (non-working
commands have a '*' prefix) are listed below. You can use either the
"Edit options" button to popup the Options Window editor to change the
input samples or the (File menu | Open Rsample) and (File
menu | Open Sample) commands.
------------------------------------
------------------------------------
------------------------------------
![]() - specify the
reference sample from samples in the current accession
database.
- specify the
reference sample from samples in the current accession
database.
![]() - specify the
current sample from samples in the current accession database.
- specify the
current sample from samples in the current accession database.
------------------------------------
------------------------------------
------------------------------------
![]() - update Accession
programs and data from open2dprot.sourceforge.net/Accession
server
- update Accession
programs and data from open2dprot.sourceforge.net/Accession
server
------------------------------------
5.2 Edit menu
These commands are used to change various defaults. These are saved
when you save the state and when you exit the program.
------------------------------------
------------------------------------
![]() - change the command
line options
- change the command
line options
5.3 View menu
This menu contains commands to inspect accession database data.
------------------------------------
------------------------------------
------------------------------------
5.4 Help menu
These commands are used to invoke popup Web browser documentation on
Accession. Some of the commands will load local documentation in the
the GUI report window.
![]() - this
reference manual
- this
reference manual
--------------------------------------
--------------------------------------
6. Downloading, installing and running Accession
The installation packages are available for
download from the SourceForge Files mirror. Look for the most
recent release named "Accession-dist-V.XX.XX.zip". These releases include
the program (both as Windows .exe file and a .jar file), required jar
libraries, demo data, Windows batch and Unix
shell scripts. Download the zip file and put the contents where you want
to install the program. Note that there is a Accession.exe
(for Windows program). You might make a short-cut to this to use in more easily
starting the program. Alternatively, you can use the sample .bat and .sh scripts
to run the program explicitly via the java interpreter. Note that this method
assumes that you have Java installed on your computer and that it is at
least JDK (Java Development Kit) or JRE (Java Runtime Environment)
version 1.5.0. If you don't have this, you can download the latest version free
from the java.sun.com Website.

Figure 6. Startup icon for Accession.exe in Windows.
Clicking on the icon starts Accession. To start Accession, click on the startup
icon shown in Figure 6 below - or you can run the demo-Accession.bat
script. For Unix systems including MacOS-X, you can start Accession from the
command line by clicking on the Accession.jar file or using the
demo-Accession.sh script. You could make short-cuts (Windows)
or symbolic-links in Unix to make it easier to start.
6.2 Requirements: minimum hardware and software requirements
A Windows PC, MacIntosh with MacOS-X, a Linux computer or a Sun
Solaris computer having a display resolution of at least
1024x768. We find that a 1024x768 is adequate, but a 1280x1024 screen
size much better since you can see the Popup Report window, Options
window, and Accession, ROI or Calibration window at the same time. At
least 30 Mb of memory available for the application is required and
more is desirable for comparing large images or performing
transforms. If there is not enough memory, it will be unable to load
the images, the transforms may crash the program or other problems may
occur.6.3 Files included in the download
The following files are packaged in the distribution you install.
you can periodically a (File | Update from Web server | ...
program) menu command to update the files from the open2dprot.sourceforge.net
Web server.
You can do a (File | Update from Web server | Accession demo files)
menu command to update it.
7. List of the command line switches
The command line usage is:
Accession [< optional switches >]
where the order of arguments is not relevant. In the following list,
items in bold are specific values which must be used (e.g., for
-inputFormat:{X | T}, whereas variable values in
italics indicate that a numeric value for that variable should
be used. Some switches have several alternate fixed choices in which
case this indicated as a list of bolded items inside of a set of
'{...}' with '|' separating the items. You must pick one of the items
and do not include the '{}' brackets. Also, do NOT include any extra
spaces in the arguments of the switch - it will be counted as if it
were another switch.
Command line switches
-accessionFile:accFile to overide the default accession
database file. (Default is -noaccessionFile:accession.xml).
-backupDatabases makes backups of the accession and landmark databases "+
"if they are edited. (Default is -commutativeLMS).
-debugBits:bits,optLandmarkNbr dumps various conditional
debugging parameters onto the report window. The 'bits' are the
debug bits specified as either octal or decimal and enable
particular debugging output if the program was compiled with
debugging enabled. (Default is -nodebug).
-default sets the default switches to a specific configuration:+
-nodemo
-inputFormat:X -projDir:demo/,
-accessionDB:accession.xml.
This disables -demo if it was set. (Default -nodefault).
-demo sets the default switches and sample input sample to a specific
configuration. This may be overriden by turning off the -demo
switch in the Options Wizard.
-dtd adds the XML DTD file in the output XML file. (Default is -nodtd).
-gui to start the spot pairing with a popup Graphical User Interface
rather than in batch mode. This captures messages from Accession.
You can then cut and paste the results or save it to a text
file. The GUI is also used to change the switch options, re-run
the spot pairing and view images after each analysis. (Default
is -nogui).
-inputFormat:
7.1 Examples of some typical sets of switches
The following shows a few examples of useful combinations of command
line switches.

Any case-independent switch may be negated by preceeding it with
a 'no' eg. '-notimer'.

The command line syntax used to invoke it is:

     Accession [< opt.-switches >]

The following examples using switches might be useful:


     Accession -gui -project:demo/
  # Start Accession and load the accession database from the demo project.

     Accession -rsample:gel-HM-019 -sample:gel-HM-071 -gui -project:demo/
  # Start Accession with two samples already in the accession database
7.2 Debug option bits for the -debug switch
The following are the orthogonal octal -debug option code bits. This
means you can add them together (in octal) and use that computed octal
number (it will also accept decimal). The
-debug:bits,landmarkNbr option is meant only for serious
programmers reading or modifying the source code.
Debugging option bits used with the "-dbug:
8. Demonstrations
8.1 Examples - samples of screen shots
To give the flavor of running the spot pairing program, we provide a
few screen shots of the graphical user interfaces and some images
generated by the program.
8.2 Example - output of the Report Window
The following Report Window output was generate for the images in the
above example.
8.3 Examples - using command line processing for batch
It is possible to run the Accession from the command line in your
operating system. We give two examples doing this. The first example
shows a script for the Microsoft Windows batch (.bat) file
for processing 4 images demo-Accession.bat file (available on the Files
Mirror. The second example
shows the same commands in a shell script for a Unix operating system
(Linux, MacOS, Solaris, etc.) is available at from the Files mirror at demo-Accession.sh. 8.3.1 Examples - batch processing under Microsoft Windows
REM File: demo-Accession.bat - accession a sample gel
REM
REM This example assumes that all .jar files listed below and demo/ directory are
REM in the current directory. Modify for other situations.
REM
REM The JDK should be installed and version 1.4 or later is required.
REM You can download the latest JDK from http://java.sun.com/
REM
REM The files needed are listed below:
REM JAR files required and mentioned in manifest:
REM     xml-apis.jar xercesImpl.jar jai_codec.jar jai_core.jar O2Plib.jar
REM demo Files:
REM      demo/ppx/gel-HM-019
REM Accession database file is in:
REM      demo/xml/accession.xml
REM Generated Sample Spot-list Files (SSF) are saved in:
REM      demo/xml/
REM Generated images are saved in:
REM      demo/tmp/
REM
REM P. Lemkin $Date$

echo "demo-Accession.bat"

pwd
date /T

java -Xmx256M -jar Accession.jar -demo -gui -project:demo\

echo "-- Finished accessioning the samples ---"

date /T
8.3.2 Examples - batch processing under Unix (or MacOS-X)
Because java is relatively operating system independent, the same java
command lines are used with the "\" changed to "/", "REM" changed to
"#", and "DATE/T" to "date" from Windows to
Unix script and file path conventions.
#!/bin/sh
# File: demo-Accession.sh - accession a sample gel
#
# This example assumes that all .jar files listed below and demo/ directory are
# in the current directory. Modify for other situations.
#
# The JDK should be installed and version 1.4 or later is required.
# You can download the latest JDK from http://java.sun.com/
#
# The files needed are listed below:
# JAR files required and mentioned in manifest:
#     xml-apis.jar xercesImpl.jar jai_codec.jar jai_core.jar O2Plib.jar
#
# demo Files:
#      demo/ppx/gel-HM-019
# Accession database file is in:
#      demo/xml/accession.xml
# Generated Sample Spot-list Files (SSF) are saved in:
#      demo/xml/
# Generated images are saved in:
#      demo/tmp/
#
# P. Lemkin $Date$

echo "demo-Accession.sh"

pwd
date

java -Xmx256M -jar Accession.jar -demo -gui -project:demo/

echo "-- Finished accessioning the samples ---"

date
9. Accession References
These papers (a subset of the GELLAB-II papers),
reference the GELLAB-II spot pairing program. The Open2Dprot
Java-language Accession program was other Open2Dprot programs and
concepts were used from the old GELLAB-II C-language program as well
as from code from the MAExplorer and Flicker projects.
This program will be replaced with a full XML editor that will make
use of the new MIAPE standard. New Java code was added as
well. Although Accession has been enhanced in many ways, the basic
methods are similar so these papers may be useful for more details on
the algorithm.
| Contact us | Accession is a contributed program available at
open2dprot.sourceforge.net/Accession
Powered by |
Revised: 12/06/2005 |